Wednesday, May 30, 2012

Caching is Asp.Net Part I


In this series for Caching side we will talk about
·         i) Page caching (called Output Caching)
·         ii) Data caching
·         iii) Control caching
·         iv) Cache Dependencies(like how cache depends on a file)
·         v) Setting Cache lifetimes
The idea of caching is that information is not constantly changing, the information that is kind of static over a long period of time asp.net should not come up every time someone ask for it. So
“Caching is a way to generate the result once and sending that result to multiple different user over coarse of time”.
Lots of different level of caching.
You can cache the output of application data, the entire page, just a fragment of page like the output of particular control and you can also do thing like set cache dependencies , i.e you can say that I don’t want this information for more than  1 hr  as after this gonna change, or I want until some and some file changes.
Lets do the couple of things.

Page Caching
  •          Page level, or output caching, caches the HTML output of dynamic requests to ASP.NET Web pages. The way ASP.NET implements this (roughly) is through an Output Cache engine. Each time an incoming ASP.NET page request comes in, this engine checks to see if the page being requested has a cached output entry. If it does, this cached HTML is sent as a response; otherwise, the page is dynamically rendered, it's output is stored in the Output Cache engine.
  •      Output Caching is particularly useful when you have very static pages.
  •      Output caching is easy to implement. By simply using the @OuputCache page directive, ASP.NET Web pages can take advantage of this powerful technique.
Below page directive in your page write
<%@ Page Language="C#" AutoEventWireup="true"  CodeFile="Default.aspx.cs" Inherits="_Default" %>
<%@ OutputCache Duration="5" VaryByParam="none" %>
Now the page will cache for 5 sec and its not gonna change by anything so varybyparam=”none”.

Creating Demo Page : 
 <%@ OutputCache Duration="5" VaryByParam="none" %>

<body>
    <form id="form1" runat="server">
    <div>
    <h1> Output Caching Demo</h1>
   </div>
   <div>
This page is cached for a duration of 5 seconds. When this page was last cached the date/time was <%=DateTime.Now.ToLongTimeString()%>. Refresh repeatedly and you'll see that this time remains constant until the cache is expired, then it is updated to the current time.
The reason this time stays constant is because the HTML generated by this ASP.NET Web page is cached using Output Caching. To enable Output Caching, simply add the following declaration to the top of your ASP.NET Web page:
< %@OutputCache Duration="durationInSeconds" VaryByParam="varyBy" % >


    </div>
    </form>

Understand VaryByParam parameter 

The VaryByParam parameter is used to indicate whether any GET (QueryString) or POST (via a form submit with method="POST") parameters should be used in varying what gets cached. In other words, multiple versions of a page can be cached if the output used to generate the page is different for different values passed in via either a GET or POST.
The VaryByParam is a useful setting that can be used to cache different "views" of a dynamic page whose content is generated by GET or POST values. For example, you may have an ASP.NET Web page that reads in a Part number from the QueryString and displays information about a particular widget whose part number matches the QueryString Part number. Imagine for a moment that Output Caching ignored the QueryString parameters altogether (which you can do by setting VaryByParam="none"). If the first user visited the page with QueryString /ProductInfo.aspx?PartNo=4, she would see information out widget #4. The HTML for this page would be cached. The next user now visits and wished to see information on widget #8, a la /ProductInfo.aspx?PartNo=8. If VaryByParam is set to VaryByParam="none", the Output Caching engine will assume that the requests to the two pages are synonymous, and return the cached HTML for widget #4 to the person wishing to see widget #8! To solve for this problem, you can specify that the Output Caching engine should vary its caches based on the PartNo parameter by either specifying it explicitly, like VaryByParam="PartNo", or by saying to vary on all GET/POST parameters, like: VaryByParam="*".

In the next section we will see how to use web.config to create the cache profile(another way of doing page caching), how to discard a cache and how can we  set the cache dependency.(i.e keep the cache until so and so file doesn't changes).


Wednesday, May 23, 2012

Sending Mail with template in Asp.Net

Step 1. Create as aspx page and name it "SendMailWithTemplate.aspx".


<body>
    <form id="form1" runat="server">
    <div>
    <asp:Button ID="btnSendEmail" Text="send mail using mail defination" runat="server" onclick="btnSendEmail_Click" />
    <asp:Label ID="errorMsg" runat="server"></asp:Label>
    </div>
    </form>
</body>


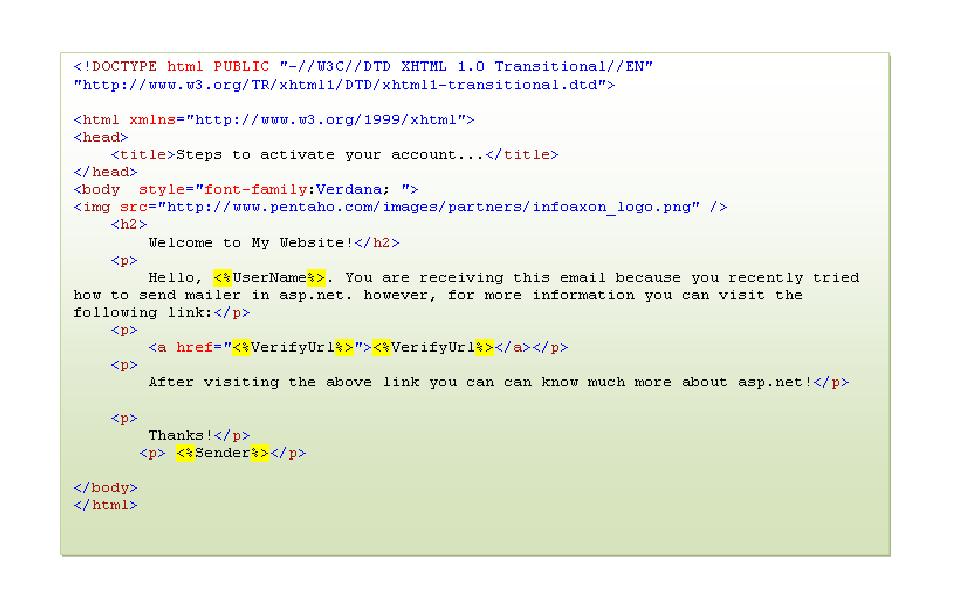
Step 2. Add an html file NewAccountTemplate as shown below:


Step 3. This is a simple html file with placeholder which we will replace at runtime.


Step 4. Modify your web.config file to include the section
<system.net>
<mailSettings>
<smtp>
<network host="your host name here..." port="25" userName="username here...." password="password goes here...."/>
</smtp>
</mailSettings>
</system.net>

Step 5. Now in .cs file in the button click event we use MailDefination class(Hidden jem in Asp.Net) to use html template file.

protected void btnSendEmail_Click(object sender, EventArgs e)
    {
        
            MailMessage msg = CreateMessage();
            try
            {
                SmtpClient sc = new SmtpClient();
                sc.Send(msg);
            }
            catch (HttpException ex)
            {
                errorMsg.Text = ex.ToString();
            }


    }
    protected MailMessage CreateMessage()
    {
        MailDefinition md = new MailDefinition();
        //here you give the template file name.
        md.BodyFileName = "~/EmailTemplates/NewAccountTemplate.htm";
        //md.CC = sourceCC.Text;
        md.From = "baunthiyal_pankaj@abc.com";
        md.Subject = "Testing Mailer Functionality in Asp.Net";
        //IsBodyHtml=> don't forget to set this property otherwise,
        //your mail would not be an html mail and you will
        //see the html tags there.
        md.IsBodyHtml = true;
        md.Priority = MailPriority.High;
        ListDictionary replacements = new ListDictionary();
        replacements.Add("<%UserName%>", "Vipin");
        replacements.Add("<%VerifyUrl%>", "anything4it.blogspot.in");
        replacements.Add("<%Sender%>", "Pankaj Baunthiyal");
        System.Net.Mail.MailMessage fileMsg;
        //CreateMailMessage: first argument is the comman separated recipient address.
        fileMsg = md.CreateMailMessage("pankaj.baunthiyal@xyz.com", replacements, this);
       // fileMsg.Body.Replace
        return fileMsg;
    }


Tuesday, May 22, 2012

Retrieving Query Strings in Javascript


Javascript can be used for retrieves query string values too. We need the following code to get query string pairs (field & value) using Javascript:
window.location.search

The above code will return string started with ampersand in the URL (ampersand included). So if we run the above code against the following URL: http://localhost:8088/postings/QrStr/testjs2.htm?name=alma&role=user
The return value is ?name=alma&role=user

To understand the concept better I have write two simple HTML pages that show how to get query string values using Javascript. This is the first file (testqrstr.htm):

      <html>
      <head>
      <title>Test Query Strings: Page 1</title>
      <script lang=”javascript” type=”text/javascript”>
      function testQueryStrings()
      {
      // change the window.location with your own.
      window.location = “/…/testjs2.htm?name=alma&role=user”;
      }
      </script>
      </head>
      <body>
      <input type=”button” id=”btn” value=”Test Query Strings” onclick=”testQueryStrings()” />
      </body>
      </html>

The output produced by testjs.htm is similar like the output of Test.aspx, when we click the button it will bring us to testjs2.htm (of course with the specified query strings!). Here testjs.htm:

      <html>
      <head>
      <title>Test Query Strings: Page 2</title>
      <script lang=”javascript” type=”text/javascript”>
      var qrStr = window.location.search;
      var spQrStr = qrStr.substring(1);
      var arrQrStr = new Array();
      // splits each of pair
      var arr = spQrStr.split(‘&’);

      for (var i=0;i<arr.length;i++){
      // splits each of field-value pair
      var index = arr[i].indexOf(‘=’);
      var key = arr[i].substring(0,index);
      var val = arr[i].substring(index+1);

      // saves each of field-value pair in an array variable
      arrQrStr[key] = val;
      }

      document.write(“<h1>Name parameter: “+arrQrStr["name"]+”. Role parameter: “+arrQrStr["role"]+”</h1>”);
      </script>
      </head>
      <body>
      </body>
      </html>

What I was did in testjs2.htm just retrieve the query strings (through window.location.search), save each of field – value pair in an array variable named arrQrStr and echo the content of arrQrStr variable.

Tuesday, January 10, 2012

Creating Mail Scheduler in C#

Today while developing a page for sending mail, I was asked to create a scheduler in c# that would send mail on periodically.
I did an R&D for that and resolved the problem creating WindowServices in c#.

Its easy just go thr these steps;

1.Open Visual Studio.net > Select New Project

2.Select Windows Service and give Name as 'MailScheduler' and Click Ok.

3.Right Click the Design and Select Properties and give the Name and ServiceName as

'ScheduleMail' and set AutoLog to 'True'

4.Right Click the Design and select View Code and

Select Project > Add Reference > Select System.Web >Press Ok

5.Now add the following to your code

using System.Web.Mail;

In static void Main()

ServiceBase[] ServicesToRun;
ServicesToRun = new ServiceBase[]
{
new ScheduleMail()
};
ServiceBase.Run(ServicesToRun);

6. Edit the following code in onstart()

protected override void OnStart(string[] args)
{
eventLogSimple.WriteEntry("ScheduleMail service started at :" + DateTime.Now.ToShortDateString().Trim());
System.Timers.Timer timer = new System.Timers.Timer();
timer.Interval = 30000; //1000 for 1sec so 1hr has 3600sec and 1day has 3600*24 sec
//i.e 86400 sec
//hence for this in ms = 86400000(for one day)
timer.AutoReset = true;
timer.Elapsed += new System.Timers.ElapsedEventHandler(timer_TimeElapsed);
// timer_TimeElapsed();
timer.Enabled = true;
eventLogSimple.WriteEntry("mail sent successfully at :" + DateTime.Now.ToShortDateString().Trim());

}

Add following method
private static void timer_TimeElapsed(object source, System.Timers.ElapsedEventArgs e)
{
if (DateTime.Now.ToShortDateString().Trim() == "1/10/2012")
{

MailMessage msg = new MailMessage();
msg.To = "toaddress here..";
msg.From = "from address here..";
msg.Subject = "Test Scheduler";
msg.BodyFormat = MailFormat.Text;
msg.Body = "this is a scheduled mail from mail scheduler..";
msg.Fields["http://schemas.microsoft.com/cdo/configuration/smtpserver"] = "servernamehere...";
msg.Fields["http://schemas.microsoft.com/cdo/configuration/smtpserverport"] = 25;
msg.Fields["http://schemas.microsoft.com/cdo/configuration/sendusing"] = 2;
msg.Fields["http://schemas.microsoft.com/cdo/configuration/smtpauthenticate"] = 1;

////Most of the times the @domain is necessary with the username
msg.Fields["http://schemas.microsoft.com/cdo/configuration/sendusername"] = "username here..";
msg.Fields["http://schemas.microsoft.com/cdo/configuration/sendpassword"] = "password here..";
SmtpMail.SmtpServer = "servername here..";
SmtpMail.Send(msg);
}
}

7.Go to Design,right click and Select Add Installer ,you will notice two controls

serviceProcessInstaller1,serviceInstaller1

8.Select serviceProcessInstaller1 and go to its properties and change the Account

type to 'Local System'

9. Select serviceInstaller1 and go to its properties and change DisplayName and

ServiceName to 'ScheduleMail' and make the StartType to 'Automatic'

10.Build the Solution

11.Open the Visual Studio .Net Command Prompt and give the path of application

for example C:\bin\Debug and then type InstallUtil MailScheduler.exe

to uninstall, InstallUtil /u MailScheduler.exe

15. After Installation ,right click My Computer and

Select 'Manage'

and Select 'Service and Applications'

and in that Select 'Services'

Select ScheduleMail' and start the Service.

Good Luck!!!

Wednesday, January 4, 2012

Sending Mail Using System.Web.Mail/System.Net.Mail with Attachments

Hello friends,
Today also I did a lot of R&D for sending mail using System.Web.Mail for .Net 1.1.
Many of you are seeing this post because while trying sending mail in 1.1 you are unable to do so.

If you thought that it was a serious shortcoming that .Net framework 1.1 wasn't able to send email through SMTP servers that used authentication, you are in grave ignorance. On the surface of it, yes, you cannot send an email with the standard System.Web.Mail.MailMessage class; but you can of course play tricks on the Exchange server (yeah, that's what I get out of it that this things works only on an Exchange server) to make it authenticate you.

There is a namespace called http://schemas.microsoft.com/cdo/configuration that does those funny (and highly interesting) tricks.

Here both the version for you. Send mail either using System.Web.Mail or System.

protected void SendMail()
{
//step 1:
MailMessage msg = new MailMessage();
//Either use above if you are using System.Web.Mail or uncomment below one if using System.Net.Mail
//System.Net.Mail.MailMessage mail = new System.Net.Mail.MailMessage();
string smtpServer = "";

//step 2:
msg.To = _emailIdsToSend;
//Either use above if you are using System.Web.Mail or uncomment below one if using System.Net.Mail
//mail.To.Add(_emailIdsToSend);

//step 3:
msg.From = "dummyfrom@dummy.com";
//Either use above if you are using System.Web.Mail or uncomment below one if using System.Net.Mail
// mail.From = new System.Net.Mail.MailAddress("dummyfrom@dummy.com");
string date = DateTime.Now.ToString("dd-MM-yyyy");

//step 4:
msg.Subject = "Test Mail on : "+date;
//Either use above if you are using System.Web.Mail or uncomment below one if using System.Net.Mail
//mail.Subject = "Test Mail on : " + date;

//step 5:
msg.Body = "some text goes here...";
//Either use above if you are using System.Web.Mail or uncomment below one if using System.Net.Mail
//mail.Body = "some text goes here..";

//step 6:
//attachments here...
MailAttachment attachment = new MailAttachment(finalFileToAttach);
//Either use above if you are using System.Web.Mail or uncomment below one if using System.Net.Mail
//System.Net.Mail.Attachment attachment = new System.Net.Mail.Attachment(finalFileToAttach);

//step 7:
msg.Attachments.Add(attachment);
//Either use above if you are using System.Web.Mail or uncomment below one if using System.Net.Mail
//mail.Attachments.Add(attachment);

//step 8:
msg.BodyFormat = MailFormat.Html;
//Either use above if you are using System.Web.Mail or uncommet below one if using System.Net.Mail
//mail.IsBodyHtml = true;

//step 9:credentials
msg.Fields["http://schemas.microsoft.com/cdo/configuration/smtpserver"] = "yoursmtpserverhere..";
msg.Fields["http://schemas.microsoft.com/cdo/configuration/smtpserverport"] = 25;
msg.Fields["http://schemas.microsoft.com/cdo/configuration/sendusing"] = 2;
msg.Fields["http://schemas.microsoft.com/cdo/configuration/smtpauthenticate"] = 1;
////Most of the times the @domain is necessary with the username
msg.Fields["http://schemas.microsoft.com/cdo/configuration/sendusername"] = "usernamewithdomainehere..";
msg.Fields["http://schemas.microsoft.com/cdo/configuration/sendpassword"] = "passwordhere..";
//If only the server uses SSL, in this case, the smtpserverport field would be different too
message.Fields["http://schemas.microsoft.com/cdo/configuration/smtpusessl"] = true;
if (ConfigurationSettings.AppSettings["SMTPServerName"].ToString() != null && ConfigurationSettings.AppSettings["SMTPServerName"].ToString() != "")
SmtpMail.SmtpServer = ConfigurationSettings.AppSettings["SMTPServerName"].ToString().Trim();
//.net either use above if you are using System.Web.Mail or uncommet below one if using System.Net.Mail
//System.Net.Mail.SmtpClient client = new System.Net.Mail.SmtpClient();
//client.Host = "yoursmtpserverhere..";
//client.Credentials=new System.Net.NetworkCredential("usernamewithdomainhere", "password here");
//client.Port = 25;
//step 10: Send Mail
try
{

SmtpMail.Send(msg);
//.net either use above if you are using System.Web.Mail or uncommet below one if using System.Net.Mail
//client.Send(mail);
}
finally
{
//mail.Dispose();
msg = null;
attachment = null;

}
}

Tuesday, January 3, 2012

Writing CSV To File

protected string WriteToCSVForMail(DataTable dt, string fileName, NameValueCollection nvcCriteria)
{
//file name should be the full path of the file.
string fileNameWithExt = fileName + ".csv";
FileInfo fileToWorkOn = new FileInfo(fileNameWithExt);
//check if file exist, if not create one
if (!fileToWorkOn.Exists)
{
FileStream createdFile = fileToWorkOn.Create();
createdFile.Close();
fileToWorkOn = new FileInfo(fileNameWithExt);
}
StreamWriter writer = fileToWorkOn.CreateText();
//trying to write the criteria in downloaded csv file.
writer.Write("Following Criterion is used to generate this Report");
writer.Write(Environment.NewLine);
writer.Write("FromDate : " + nvcCriteria["FromDate"]);
writer.Write(Environment.NewLine);
writer.Write("ToDate : " + nvcCriteria["ToDate"]);
writer.Write(Environment.NewLine);
writer.Write("QuoteId : " + nvcCriteria["QuoteId"]);
writer.Write(Environment.NewLine);
writer.Write("QuoteStatus : " + nvcCriteria["StatusText"]);
writer.Write(Environment.NewLine);
writer.Write("Product : " + nvcCriteria["ProductText"]);
writer.Write(Environment.NewLine);
writer.Write("AccessType : " + nvcCriteria["AccessText"]);
writer.Write(Environment.NewLine);
foreach (DataColumn column in dt.Columns)
{

writer.Write(column.ColumnName + ",");

}

writer.Write(Environment.NewLine);
foreach (DataRow row in dt.Rows)
{

for (int i = 0; i < dt.Columns.Count; i++)
{

string outputS = EscapeCsvField(row[i].ToString());
writer.Write(outputS + ((i < dt.Columns.Count - 1) ? "," : Environment.NewLine));

}
}
writer.Close();
return fileNameWithExt;
//properties of FileInfo class
//Console.WriteLine("Full name of the file we are working on : " + fileToWorkOn.FullName);
//Console.WriteLine("Full name of the directory file is on : " + fileToWorkOn.DirectoryName);
//fileToWorkOn.CopyTo("d:\\test2copy.txt");
//fileToWorkOn.Delete();
}

use same EscapeCSVField method I used in earlier post.

Enjoy Coding!

Exporting DataTable To CSV File

Hi All
Once again I feel if you have tried writing to Csv, You must have faced problem of delimiter collision.
Here is the solution:
protected void ExportToCSV(DataTable dataTable, string fileName, NameValueCollection nvcCriteria)
{

HttpContext context = HttpContext.Current;

context.Response.Clear();

//trying to write the criteria in downloaded csv file.
context.Response.Write("Following Criterion is used to generate this Report.");
context.Response.Write(Environment.NewLine);
context.Response.Write("FromDate : " + nvcCriteria["FromDate"]);
context.Response.Write(Environment.NewLine);
context.Response.Write("ToDate : " + nvcCriteria["ToDate"]);
context.Response.Write(Environment.NewLine);
context.Response.Write("QuoteId : " + nvcCriteria["QuoteId"]);
context.Response.Write(Environment.NewLine);
context.Response.Write("QuoteStatus : " + nvcCriteria["StatusText"]);
context.Response.Write(Environment.NewLine);
context.Response.Write("Product : " + nvcCriteria["ProductText"]);
context.Response.Write(Environment.NewLine);
context.Response.Write("AccessType : " + nvcCriteria["AccessText"]);
context.Response.Write(Environment.NewLine);
foreach (DataColumn column in dataTable.Columns)
{

context.Response.Write(column.ColumnName + ",");

}

context.Response.Write(Environment.NewLine);


foreach (DataRow row in dataTable.Rows)
{

for (int i = 0; i < dataTable.Columns.Count; i++)
{

string outputS = EscapeCsvField(row[i].ToString());
//Response.Write(row[i].ToString());
context.Response.Write(outputS + ((i < dataTable.Columns.Count - 1) ? "," : Environment.NewLine));

}

//context.Response.Write(Environment.NewLine);

}

context.Response.ContentType = "text/csv";

context.Response.AppendHeader("Content-Disposition", "attachment; filename=" + fileName + ".csv");

context.Response.End();

}

Below is the EscapeCSVField method for handling delimiter collision.
private string EscapeCsvField(string sFieldValueToEscape)
{

// since we delimit values with a comma, we need to escape commas that are

// actually in the value to escape. We do this by putting a (") quote at

// the front and end of the string.

if (sFieldValueToEscape.Contains(","))
{

// if the string we are escaping already has a (") quote in it, we have to

// 'escape the escape character' by putting double quotes in it's place.

if (sFieldValueToEscape.Contains("\""))
{

return "\"" + sFieldValueToEscape.Replace("\"", "\"\"") + "\"";

}

else
{

// there are no quotes in this string so just escape it by wrapping it in

// quotes.

return "\"" + sFieldValueToEscape + "\"";

}

}

else
{

// There are no commas in this string so just return it as is

return sFieldValueToEscape;

}

}

Happy Programming!